![](https://static.wixstatic.com/media/6ff924_a3725d2dac17442dbeaa62dd959f16f1~mv2.gif/v1/fill/w_351,h_495,al_c,pstr/6ff924_a3725d2dac17442dbeaa62dd959f16f1~mv2.gif)
I started this portrait on a new A3 Document And lowered the resolution from 300 to 10
![](https://static.wixstatic.com/media/6ff924_1fc3d4855d054e80a4035d8cc4bcb375~mv2.png/v1/fill/w_980,h_573,al_c,q_90,usm_0.66_1.00_0.01,enc_avif,quality_auto/6ff924_1fc3d4855d054e80a4035d8cc4bcb375~mv2.png)
I dragged my photo from finder into the canvas.
![](https://static.wixstatic.com/media/6ff924_3ad37b52568141bd9f3ef10715ee6c75~mv2.jpg/v1/fill/w_980,h_534,al_c,q_85,usm_0.66_1.00_0.01,enc_avif,quality_auto/6ff924_3ad37b52568141bd9f3ef10715ee6c75~mv2.jpg)
Then used CMND + T To transform it to the size I wanted
![](https://static.wixstatic.com/media/6ff924_e49bb12b7d77460f8a3b5914ea588164~mv2.jpg/v1/fill/w_980,h_1065,al_c,q_85,usm_0.66_1.00_0.01,enc_avif,quality_auto/6ff924_e49bb12b7d77460f8a3b5914ea588164~mv2.jpg)
I then used the Pencil Tool and adjusted the size of the brush with the bracket keys [ ]
![](https://static.wixstatic.com/media/6ff924_ecd14d8351a34355aa96f2545dc5825c~mv2.jpg/v1/fill/w_68,h_55,al_c,q_80,enc_avif,quality_auto/6ff924_ecd14d8351a34355aa96f2545dc5825c~mv2.jpg)
I drew my Eboy portrait with the pencil tool and selected colors to use from my photo with the EyeDropper tool.
![](https://static.wixstatic.com/media/6ff924_59c5e1ab8aa34c9abcab293f868b5341~mv2.jpg/v1/fill/w_72,h_57,al_c,q_80,enc_avif,quality_auto/6ff924_59c5e1ab8aa34c9abcab293f868b5341~mv2.jpg)
I used the eraser Tool set to block mode to fix mistakes.
![](https://static.wixstatic.com/media/6ff924_3f5f0492e5c24539832d4a9703c91aef~mv2.jpg/v1/fill/w_70,h_57,al_c,q_80,enc_avif,quality_auto/6ff924_3f5f0492e5c24539832d4a9703c91aef~mv2.jpg)
I used the Brush tool sometimes to help blend tones
![](https://static.wixstatic.com/media/6ff924_90f0ddedfa8348148780beea36601ed7~mv2.jpg/v1/fill/w_62,h_46,al_c,q_80,enc_avif,quality_auto/6ff924_90f0ddedfa8348148780beea36601ed7~mv2.jpg)
I managed All my different facial features on separate layers so I could edit them easier, and I made colour swatches at the top of my screen so I could get each tone colour I needed quickly with the eyedropper tool.
![](https://static.wixstatic.com/media/6ff924_2f057333b4ed43609a20bc7489db5b47~mv2.png/v1/fill/w_484,h_738,al_c,q_85,enc_avif,quality_auto/6ff924_2f057333b4ed43609a20bc7489db5b47~mv2.png)
![](https://static.wixstatic.com/media/6ff924_25e13fef98734b2aa31ab8fbef1d4db1~mv2.png/v1/fill/w_948,h_1138,al_c,q_90,enc_avif,quality_auto/6ff924_25e13fef98734b2aa31ab8fbef1d4db1~mv2.png)
Progress Pictures:
![](https://static.wixstatic.com/media/6ff924_c21d43b9add7419684301d9f9af6867a~mv2.png/v1/fill/w_914,h_1290,al_c,q_90,enc_avif,quality_auto/6ff924_c21d43b9add7419684301d9f9af6867a~mv2.png)
![](https://static.wixstatic.com/media/6ff924_1f2981d69222423d9a6c61e8c6eef084~mv2.png/v1/fill/w_928,h_1308,al_c,q_90,enc_avif,quality_auto/6ff924_1f2981d69222423d9a6c61e8c6eef084~mv2.png)
To make the background I made a new layer under all other layers, named it background, and I made a gradient by drawing different shades of purple on top of each other with the brush tool.
![](https://static.wixstatic.com/media/6ff924_3f9a8b9833b14a9f8cbf8829e07910ea~mv2.png/v1/fill/w_946,h_1280,al_c,q_90,enc_avif,quality_auto/6ff924_3f9a8b9833b14a9f8cbf8829e07910ea~mv2.png)
![](https://static.wixstatic.com/media/6ff924_d8a9da6f79d043c3b94df2abfdef55d0~mv2.png/v1/fill/w_912,h_1284,al_c,q_90,enc_avif,quality_auto/6ff924_d8a9da6f79d043c3b94df2abfdef55d0~mv2.png)
Then to add isometric buildings I made a new layer. and with he pencil tool I drew a square that's isometrical
![](https://static.wixstatic.com/media/6ff924_61a14cbd2a884771a86ad825e4713bd3~mv2.png/v1/fill/w_980,h_629,al_c,q_90,usm_0.66_1.00_0.01,enc_avif,quality_auto/6ff924_61a14cbd2a884771a86ad825e4713bd3~mv2.png)
Then I used the Lasso Tool to select the shape. and made sure to turn Anti alias off
![](https://static.wixstatic.com/media/6ff924_83441b9ad7cf479db01e3fc5d1802950~mv2.png/v1/fill/w_63,h_55,al_c,q_85,enc_avif,quality_auto/6ff924_83441b9ad7cf479db01e3fc5d1802950~mv2.png)
![](https://static.wixstatic.com/media/6ff924_7a753c4e3f7342cda576c4bccb932929~mv2.png/v1/fill/w_608,h_170,al_c,q_85,enc_avif,quality_auto/6ff924_7a753c4e3f7342cda576c4bccb932929~mv2.png)
![](https://static.wixstatic.com/media/6ff924_87fea0ae6bd645dc97ceb4d572eefd1e~mv2.jpg/v1/fill/w_980,h_629,al_c,q_85,usm_0.66_1.00_0.01,enc_avif,quality_auto/6ff924_87fea0ae6bd645dc97ceb4d572eefd1e~mv2.jpg)
Then I chose the Move Tool
![](https://static.wixstatic.com/media/6ff924_b0621c7187324be09de288093a3d846e~mv2.png/v1/fill/w_70,h_62,al_c,q_85,enc_avif,quality_auto/6ff924_b0621c7187324be09de288093a3d846e~mv2.png)
I clicked and held on my selected image, held down Alt (to copy) and Shift (to move in a straight vertical line) and dragged it down as far as I wanted my building to be.
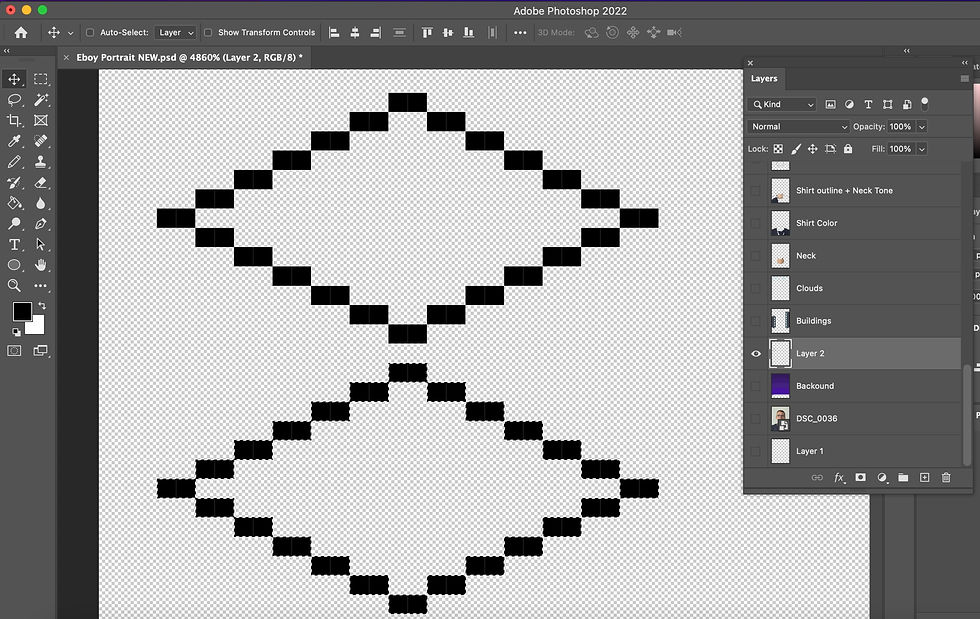
![](https://static.wixstatic.com/media/6ff924_787faef6c0914463a799891dee464963~mv2.jpg/v1/fill/w_980,h_619,al_c,q_85,usm_0.66_1.00_0.01,enc_avif,quality_auto/6ff924_787faef6c0914463a799891dee464963~mv2.jpg)
I then drew straight vertical lines to fill the cube. I did this with the pencil Tool by clicking on the first point, Holding shift, and clicking when I want the line to end.
I then erased the extra lines on the bottom square.
![](https://static.wixstatic.com/media/6ff924_3f5f0492e5c24539832d4a9703c91aef~mv2.jpg/v1/fill/w_70,h_57,al_c,q_80,enc_avif,quality_auto/6ff924_3f5f0492e5c24539832d4a9703c91aef~mv2.jpg)
![](https://static.wixstatic.com/media/6ff924_c4d296e6760f41bd93a156235070e6af~mv2.png/v1/fill/w_72,h_72,al_c,q_85,enc_avif,quality_auto/6ff924_c4d296e6760f41bd93a156235070e6af~mv2.png)
![](https://static.wixstatic.com/media/6ff924_50251cf9dbdd407c98dba89e428766cb~mv2.png/v1/fill/w_762,h_1242,al_c,q_90,enc_avif,quality_auto/6ff924_50251cf9dbdd407c98dba89e428766cb~mv2.png)
I then chose a colour to fill it with using the Paint Bucket Tool
![](https://static.wixstatic.com/media/6ff924_8b313a86653e43d5888f21175e5543b5~mv2.png/v1/fill/w_70,h_58,al_c,q_85,enc_avif,quality_auto/6ff924_8b313a86653e43d5888f21175e5543b5~mv2.png)
![](https://static.wixstatic.com/media/6ff924_e30fff61f58b48bca4485dcdd6c4d8fa~mv2.png/v1/fill/w_980,h_709,al_c,q_90,usm_0.66_1.00_0.01,enc_avif,quality_auto/6ff924_e30fff61f58b48bca4485dcdd6c4d8fa~mv2.png)
I also added more smaller squares with the buildings to make windows
![](https://static.wixstatic.com/media/6ff924_9597a914af2b4be69cac10a2b7a1ad52~mv2.png/v1/fill/w_472,h_1394,al_c,q_90,enc_avif,quality_auto/6ff924_9597a914af2b4be69cac10a2b7a1ad52~mv2.png)
I made clouds with the pencil tool, and arranged them at the top of my image.
![](https://static.wixstatic.com/media/6ff924_7350322c8eaa45a1b7c60b5ad0571f73~mv2.png/v1/fill/w_980,h_408,al_c,q_90,usm_0.66_1.00_0.01,enc_avif,quality_auto/6ff924_7350322c8eaa45a1b7c60b5ad0571f73~mv2.png)
Then my Portrait was finished.
although I think this was a very successful portrait, this portrait took me much longer than it should have because I was so caught up in finding the perfect skin tones, I should have just settled for something sooner instead of spending multiple hours editing till perfection (which it never will be perfect)
![](https://static.wixstatic.com/media/6ff924_a3725d2dac17442dbeaa62dd959f16f1~mv2.gif/v1/fill/w_351,h_495,al_c,pstr/6ff924_a3725d2dac17442dbeaa62dd959f16f1~mv2.gif)
Comentarios